

Today, Vincent is going to teach us how to use our sewing and gluing skills to make a lap desk using the BRG in a Box Lap Desk kit. This kit is part of our new BRG in a Box for schools and homeschool pods! Your BRG in a Box Lap Desk kit includes all the tools, materials, and instructions you need to follow along with this video and make your own lap desk. With your lap desk you can read, write, or draw anywhere. Use the white board top to write yourself notes and express your creativity when making your custom patch. You can find the written instructions at the bottom of this post, following the video. To review your sewing skills check out BRG foundations: sewing skills. For a detailed video tutorial on the whip stitch for a patch, please visit: https://www.youtube.com/watch?v=UUeLCex5zRY
Check out the rest of our BRG in a Box projects on our blog — from cooking, to sewing, to bike repair. If you are excited by the prospect of cultivating these skills at home, get together with your class or homeschool pod and contact us at info(at)buildrepairgrow(dot)org for more information on how to get your own kits!
Written Instructions
Materials and Tools:
Fabric x 2: thick or canvas-like for the lap desk and a patch of thin fabric to embellish
Foam batting (48” x 18”)
Glue: suitable for fabric bonding to plastic or wood
Measuring tape
Tailors chalk
Scissors
Thread – any color
Sewing Needle
Pins
Whiteboard x 2 (11.75” x 8.75” each)
Thimble (optional)
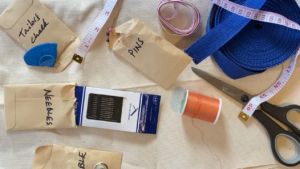
You will need a flat surface to work on as well as newspaper to protect your working surface
If you plan to create this project again, be sure to use non-toxic glue that is suitable for crafts and can bond to a variety of materials. School glue, hot glue, wood glue, and fabric-only glue are not recommended.
Safety Warning
Always use caution when using scissors and needles. Keep sharp objects away from young children and have an adult supervise or offer assistance as needed.
Step 1:
– Prepare a flat work surface or table. Cover with newspaper to protect the surface as needed.
– Assemble your materials
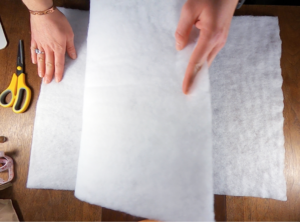
Step 2:
– You should have a long piece of foam measuring roughly 48” x 18”
– Fold the foam in half crosswise or hamburger style
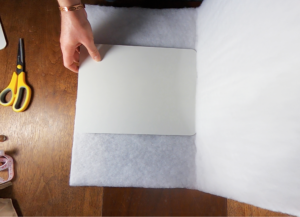
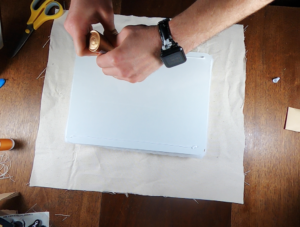
Step 3:
– Fold the foam crosswise or hamburger style again, using a whiteboard to help you get an even fold.
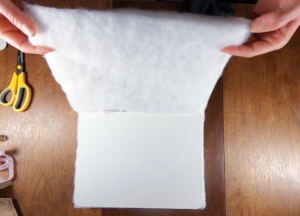
Step 4:
– Fold the foam a final time, crosswise or hamburger style. Use a whiteboard to help you get an even fold.
– The foam should now be about the same size as your whiteboard
– Folded, the foam should be roughly 2 to 3 inches thick
Step 5:
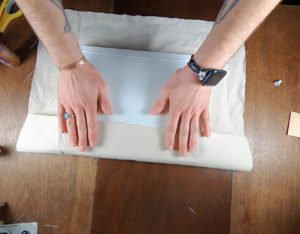
– Iron your heavy weight fabric if desired.
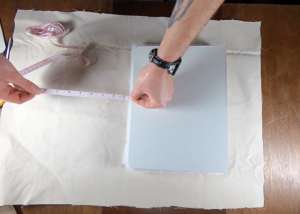
– Place the whiteboard and folded foam on top of your heavy weight fabric.
– Leave 4 inches of fabric around each side.
– You may need to trim excess fabric from the longest side (shown here being measured)
Step 6:
– Trim your fabric as needed so you have a piece that measures roughly 13” wide by 17” high
– Measure 4 inches out from the whiteboard, towards the longest edge of fabric
– Use chalk to mark 4 inches at several points
– Create a straight line by connecting each point with chalk. Use a straight edge or measuring tape as a guide.
– Cut along the chalk line to trim your fabric. It’s okay if the fabric edges are slightly uneven.
– Fabric scraps can be saved for future use.
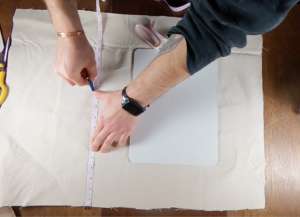
NOTE: The side with chalk marks will be hidden inside of your completed lap desk. This side will be referred to as the BACK of the heavy weight fabric.
Step 7:
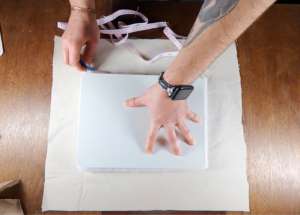
– Centre the foam and whiteboard on the BACK of the heavy weight fabric.
– Mark each corner with chalk
– Set aside measured and trimmed fabric.
Making and Placing a Patch
To give your lap desk a custom touch you can sew a patch onto the fabric. You may use any fabric or embroidered patch for this OR make your own by following these steps
Step 8:
– If you are using your own patch, skip to Step 11
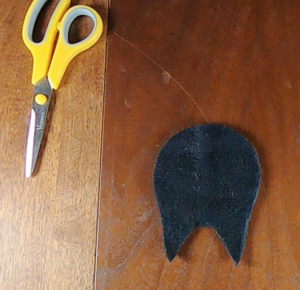
– Take your light weight fabric and lightly draw the outline of your patch (near the edge of the fabric) with chalk
– In this example we’re making a cat face shaped patch.
Step 9:
– By folding the fabric in half you will be able to create a symmetrical design (same on both sides, like a butterfly shape). If you do not want a symmetrical design you can skip to STEP 10
– Fold the fabric so your chalk drawing is folded in half (chalk side up). The crease should run down the centre of your drawing.
– Use a few pins to hold the folded fabric together
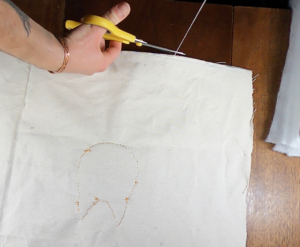
Step 10:
– Cut out your patch, following your chalk line
– You’ll want to keep the edges as neat as possible since they will be visible on your finished lap desk
– The side with chalk lines will be the BACK of the patch and will be hidden
– Remove the pins and open up your symmetrical patch
Step 11:
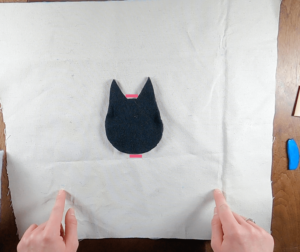
– Lay out the heavy weight fabric, BACK side UP so you can see your chalk lines
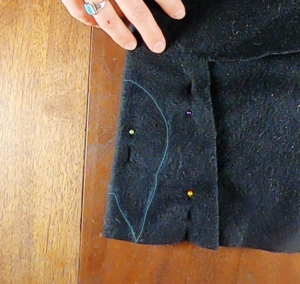
– Place your patch inside the 4 corner marks you made in STEP 7 as guides
– Once you’ve placed your patch, mark the TOP and BOTTOM of the patch by inserting pins through the heavy weight fabric only. (Pink lines in the diagram represent pins)
– The pins will serve as guides for where to place your patch on the FRONT of the heavy weight fabric
– DO NOT pin your patch to the fabric yet!
Step 12:
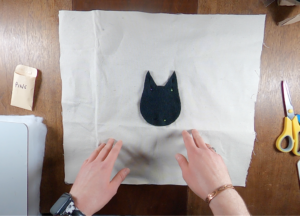
– Flip the heavy weight fabric over to the FRONT (no chalk marks)
– Place your patch between the two guide pins from Step 11
– Pin your patch to hold it in place
– Make sure the patch is face up, with chalk lines hidden on the back
– Carefully remove the guide pins once your patch is pinned in place
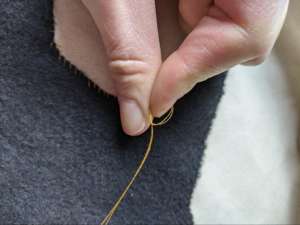
Step 13: Threading & Knotting the Needle
– Cut a length of thread about 20 inches long and thread your sewing needle
– Double the thread by lining up the two ends and pulling the threaded needle to the centre point.
To Make a Knot:
a. Wrap the ends around your forefinger and hold in place with your thumb
b. Roll the threads between your thumb and forefinger. This will cause the threads to twist together.
c. Place the tip of your middle finger at the top of the twisted threads (not the ends) and slide it down your thumb, pulling the twisted threads towards the end. You’ll need to hold the needle with your other hand to create tension, making it easier to slide the threads to the end.
d. Pull with your fingers and thumb to tighten the knot
This method may take a few tries to get it right. It’s okay if your knot is big and messy! It’ll be hidden.
Step 14: Whip Stitch
– Push your needle through the BACK of the heavy weight fabric AND the patch.
– Pull until the knot catches
a. Your thread should come out of the front of the patch fabric
b. With the thread to the side (out of the way of the needle), push the needle through the heavy weight fabric and patch fabric. This technique is similar to the one used for putting pins into two pieces of fabric.
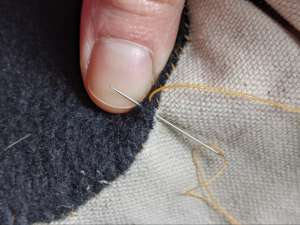
(See instruction video or above video link for details)
c, d. Pull the needle and thread through both fabrics and gently tug to tighten (pulling too tight can break the thread or cause the fabric to pucker).
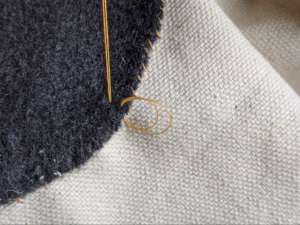
– Repeat this stitch until you have about 1 inch of thread remaining
– Use this last inch to create an ending knot on the BACK of the heavy weight fabric.
– To make a knot, push the needle through to the back, then slip it under your last stitch (from the back). Pull until a small loop of thread remains.
– Pass the needle through the loop 2 to 3 times (from the same direction) to create a knot
– Trim excess thread, leaving a few millimeters after the knot.
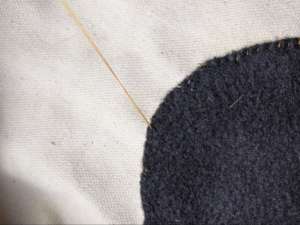
Stitching a patch using a whip stitch
For a detailed video tutorial on the whip stitch for a patch, please visit: https://www.youtube.com/watch?v=UUeLCex5zRY
NOTE: Always use a short thread when sewing. Don’t try to use a piece long enough to go around the entire patch. Having a thread that’s very long will cause tangles and knots to form as you’re sewing. It’s best to use shorter threads.
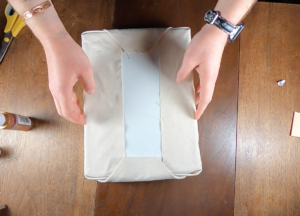
Step 15:
– Flip your heavy weight fabric over once the patch has been sewn on
– Trim any loose threads along the edges of the fabric
– Place your foam in the centre (use the guide marks made in STEP 7)
– Place one of the whiteboards on top of the foam
– Get your glue ready: Trim off the tip of the nozzle with scissors if it’s a brand new bottle. See Materials list for types of glue to use.
Step 16:
– Run a bead of glue along the long sides of the whiteboard, about ¼ inch away from the edge
– Fold the long sides over and press down onto the glue, ONE side at a time
– The fabric should be snug, but don’t pull it so tightly that the foam becomes flattened out
– Gently apply glue along the very edge of the fabric flaps. This just adds some extra security.
– Press the fabric down onto the white board and let dry for 5 to 10 minutes before moving on to the next step.
– Placing a heavy book or laptop on top will help ensure the flaps stay flat while the glue is drying.
NOTE:
– Make sure the fabric is smooth on top of the white board. Lumps and folds will make it difficult when it comes to gluing the second white board on top to form a desk surface.
Step 17:
– After letting the glue set for 5 to 10 minutes you can begin folding the short sides.
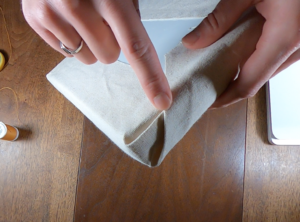
– Begin by folding one corner in, just like wrapping a gift.
– Crease the fabric with your fingers as you are folding
– Fold both corners in so you are left with a triangular flap
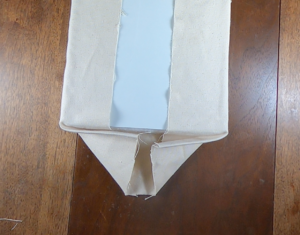
Step 18:
– Place glue on the top of the triangular flap
– Carefully fold over and glue to the top of the white board.
– Make sure the folded corners (folded against the foam) are smooth and well creased when you glue down the flap
– Repeat STEP 17 & STEP 18 for the other short side
– Once again, place a heavy item on top and allow to dry. This time allow to dry for 20 to 30 minutes.
NOTE: It’s important that the glue be mostly or completely dry before proceeding to the next step. If the glue is too wet you will have more difficulty stitching the seams and may end up with wrinkled or bunched fabric.
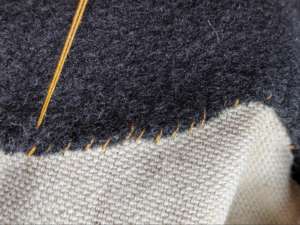
Stitching Seams
Stitching the seams will make your lap desk more durable. You can use any type of stitch for this, but this tutorial includes a modified blanket stitch (called a vertical chain stitch in our video). For a detailed guide on the blanket stitch, please visit: https://www.youtube.com/watch?v=VpTRSsbqUso
STEP 19:
– Once the glue has had time to dry you can begin stitching the folded seams.
– Thread your needle with about 12” to 15” of doubled thread. Knot the end. (See Step 13)
a & b. Make your first stitch at the top of the whiteboard so that your knot is hidden within the seam
c. For subsequent stitches, push the needle through both sides of the seam
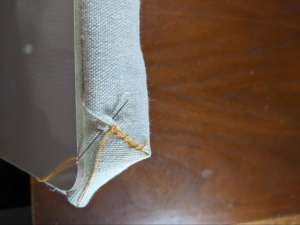
d. Pull the thread through slowly and leave a small loop. You can use your fingers to hold the thread so the loop isn’t pulled completely through.
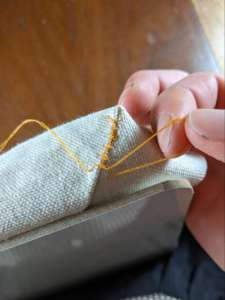
e. Put the needle though the loop. The needle should be going in the same direction as your stitch.

f. Pull the thread tight. You may need to pull it side to side a bit to get the thread to lie along the seam
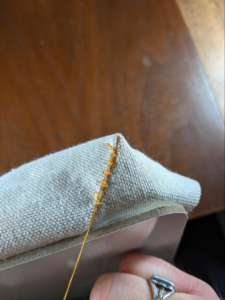
g. Continue this same stitch for all of the seams, on both ends.
Step20:
– Once the seams are stitched you can glue the final whiteboard to the top.
– On the back of the second whiteboard, run a bead of glue along the edges, about ¼ ” away from the edge.
– Then make an ‘X’ and ‘S’ patterns inside the glue bead line. This will give the glue bond extra strength.
– Carefully line up the whiteboard (glue side down) with the top of your lap desk and press down
– Let dry for at least 30 minutes. Place a heavy object on top to ensure a secure glue bond.
Enjoy using your lap desk to write notes and help you study!
We hope after this project you feel inspired to do more sewing projects (like our BRG in a Box Tool Organizer or our face mask tutorial) and share your new skills with friends and community members!